1. Preparation
1.1 Install SUMO using instruction from http://sumo.dlr.de/wiki/Installing. Binary packages are available for Linux, Windows and MacOS but if you want to extend SUMO I recommend to build from source using the instruction from http://sumo.dlr.de/wiki/Installing/Linux_Build instead.
1.2 If SUMO is properly installed you will find the SUMO home folder:
echo $SUMO_HOME
/home/<user>/sumo-0.30.0
2. Configuration
2.1 Download desired map from http://www.openstreetmap.org/export.
2.2 Convert the OSM-file into a SUMO net-file which contains all important informations about traffic like lanes, traffic lights, junctions and connections between lanes.
netconvert --osm-files htw_campus.osm -o htw_campus.net.xml
Several types of warnings may occur during the conversion. You can ignor them or if you want to avoid try a recommend action from the SUMO-wiki http://sumo.dlr.de/wiki/NETCONVERT#Warnings_during_Import
2.3 Import additional polygons for the visualization from http://sumo.dlr.de/wiki/Networks/Import/OpenStreetMap (chapter: Importing additional Polygons) or use the following command to copy an existing file from the SUMO home library to the folder which contains your simulation files.
cp $SUMO_HOME/data/typemap/osmPolyconvert.typ.xml ~/Downloads/SUMO_Projects/mechlab
Generate a polygon-file using the geometrical shapes from the OSM-file and the POLYCONVERT-command.
polyconvert --osm-files htw_campus.osm --net-file htw_campus.net.xml --type-file osmPolyconvert.typ.xml -o htw_campus.poly.xml
2.4 The randomTrips python script offers possibilities for the generation of random trips for the simulation with the aid of DUAROUTER.
python $SUMO_HOME/tools/randomTrips.py -n htw_campus.net.xml -r htw_campus.rou.xml -e 50 -l
2.5 Now we are able to run the simulation from the command line using the sumo-gui command followed by the corresponding parameters but it’s more comfortable to use a configurations script instead.
<configuration>
	<input>
		<net-file value="htw_campus.net.xml"/>
		<route-files value="htw_campus.rou.xml"/>
		<additional-files value="htw_campus.poly.xml"/>
	</input>
	<time>
		<begin value="0"/>
		<end value="300"/>
		<step-length value="0.1"/>
	</time>
</configuration>
The script includes all the files which are necessary for the simulation and configures the running time. It should be saved as *.sumocfg in the simulation directory.
3. Simulation
3.1 Start the simulation with the following command:
sumo-gui -c htw_dresden.sumocfg
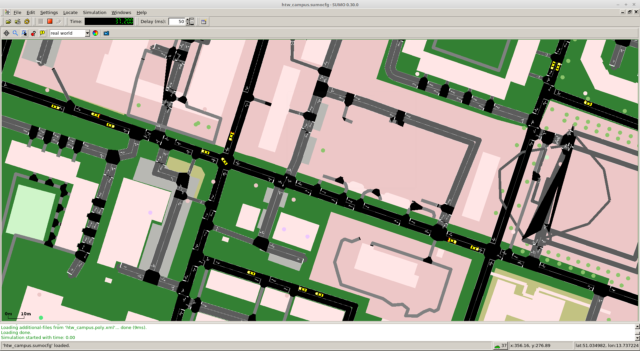
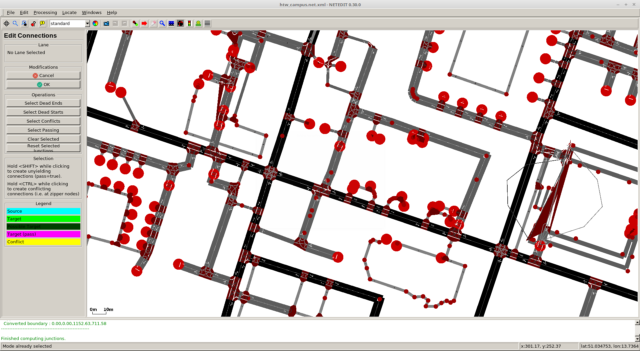
3.1 It’s obvious there are some errors in the map. Especially the conversion of the right part which contains the K-Building of HTW campus went partly wrong. You can correct them using the graphical network editor NETEDIT.
netedit -s htw_campus.net.xml
3.3 If some startup settings are required just create a new file ‚gui-settings.cfg‘ and fill in the following code:
<viewsettings>
	<scheme name="real world"></scheme>
	<viewport zoom="175" x="300" y="300"/>
	<delay value="50"/>
</viewsettings>
Now add the following line between <input></input> in the *.sumocfg:
<gui-settings-file value="gui-settings.cfg"/>
There are many GUI options avaiable on http://sumo.dlr.de/wiki/SUMO-GUI.